

Manufacturing processes are quite complex, and the choice of a production method is directly related
Learn More →
In modern product development, rapid prototyping has emerged as a critical method. This allows for quick iterations, conceptual testing, and design refinement. This blog post explains the fundamental techniques and principles essential for successful prototyping. It also elaborates on its importance, how to implement it, and the best practices. The audience will learn about workflow streamlining, tool integration, collaborative innovation, and idea realization. With a detailed explanation of the initial steps to advanced strategies, providing mastery over rapid prototyping, this blog post has one goal: improving the reader’s product development skills and knowledge.

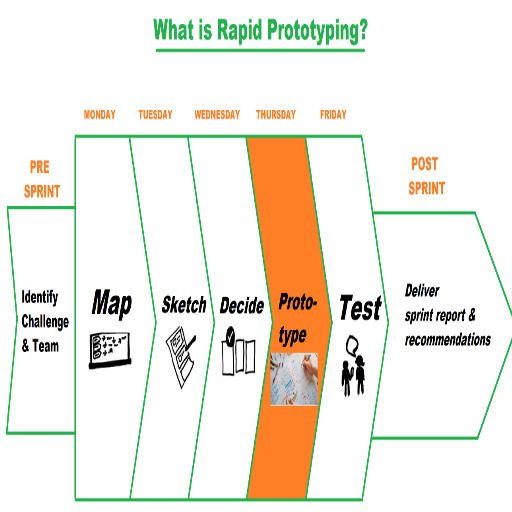
A Rapid Prototype is an early version of a prototype made quickly to test concepts, gather responses, and enhance ideas. It is a scaled-down version or replica featuring a working product model. This allows the team to test the product for its practicality and troubleshoot potential problems during the early stages of development. This step-by-step strategy lowers danger, conserves resources, and spurs creativity due to the relentless refinement of a product after its user testing and enhancement.
Set Objectives and Preconditions
Define the prototype’s techniques and functionalities in detail. Construct user-profiles and particular testable products or design features. Specific conditions might include users’ expected actions, the possibility of extending the system, and other delimiting aspects such as material characteristics and software needed.
Initial Designs
Create rough drawings or outlines that show the entire model and its capabilities. At this phase, the primary focus is movement and how to use it rather than how the model looks.
Construct the Prototype
The prototype must be built using the right tools and techniques. Intangible goods include Adobe XD or Figma. Computer-aided design (CAD) software can produce 3D models for tangible products, which can be transformed into physical copies using 3D printers or CNC machines. The primary objective is to have the required components and materials for the model.
Gather Feedback and Test
Conduct usability testing with users or stakeholders to gauge effectiveness, usability, and design. Some possible criteria are functionality success, user interaction, and response time.
Iterate and Analyze
Go through all the feedback provided and analyze for gaps. Change some of the features and design of the prototype. Completing this iterative loop helps build and improve alignment continually.
As these steps show, the rapid prototyping procedure enables efficient development phases. It shortens the gap between the initial concept and the end product while still collecting user feedback throughout the development phase.
Rapid prototyping differs significantly from traditional speed, user engagement, and iterative development methods. Unlike other approaches that operate rigidly linearly, rapid prototyping focuses more on accomplishing multiple iterations within a short time frame and testing for feedback at the earliest phases. Conventional methods require designs and products to be fully developed before constructive criticism can be given, ultimately tracing the timeline.
Some key differences include:
Development Speed: Rapid prototyping enables the speedy development of models through CAD software for 3D printing and low-code platforms. In contrast, traditional methods rely on more elaborate investing due to extensive manual processes done after planning.
Iterative Process: Unlike traditional methods, rapid prototyping allows users to provide feedback after every prototype phase, making the product more appealing to a broader range of customers. Conventional techniques, on the other hand, favor a single result, making it challenging to change designs based on user feedback.
Cost Efficiency: Rapid prototyping is more cost-effective than traditional methods because it eliminates design errors faster. Conversely, conventional methods may incur increased expenses, as designers may be delayed in changing or redeveloping products after receiving feedback.
The following are some of the technical parameters seen most often in rapid prototyping:
Tools such as SolidWorks and AutoCAD are used to create digital models.
Turnaround Time is usually a few hours to a day or two for rapid prototyping, compared to weeks with traditional methods.
Prototyping Speed: The speed of FDM model 3D printers, for example, is 60-150 mm/sec.
Material Usage – thermoplastics, resins, and metals may be utilized depending on the requirements of the prototype.
By prioritizing flexibility with quick iterations, it is clear that rapid prototyping is a very fluid alternative to traditional methodologies.
Rapid prototyping inherently incorporates CAD tools, pivotal in transforming ideas into precise designs. They provide a platform for ideal visualization, simulation, and iteration, each occurring well before any physical production starts. CAD software makes it possible to pinpoint technical challenges at preliminary stages, amend dimensions, and confirm functional correctness. Some notable technical parameters associated with CAD models are cited to be the resolution (a standard in DPI or mesh quality), dimensional tolerance ( ±0.01 to ±0.1 mm for high accuracy designs), and compatible files for maximum efficiency such as STL and OBJ for 3D printing. The flexibility that comes with the utmost detail provided by CAD makes the models crucial for aiding rapid prototyping and product development.
Methods of rapid prototyping vary according to designated requirements of design and production. These include:
3D Printing (Additive Manufacturing) – This method suits complex geometries and quick iterations. Prototypes are built layer by layer using materials like plastics, resins, or metals.
CNC Machining is a subtractive process that uses computer-controlled tools. Because the tools cut material out of a solid block, this method offers excellent precision and durability for functional prototypes.
Vacuum Casting: This technique uses silicone molds and is typically used for testing and visual presentations. It is best for small batches of prototypes.
Injection Molding—This process works best with high-fidelity prototypes. It involves cooling poured molten material in molds, allowing the final designs to be replicated.
Sheet Metal Prototyping – A method that makes metal prototypes efficient. This method is suited for structural testing and design validation by cutting, bending, and shaping metal sheets.
Selection among the offered methods is based on complexity, materials required, and the purpose of the prototype.
Additive manufacturing, or 3D printing, comprises a collection of processes that fabricate an object layer by layer, starting from a digital file. This method offers exceptional design flexibility while minimizing the amount of material used. Below are some key additive manufacturing techniques and their technical parameters:
Fused Deposition Modelling (FDM)
Materials: Thermoplastics such as PLA, ABS, and PETG.
Applications: Low-cost production of functional prototypes and parts.
Layer Thickness: Between 0.1 mm and 0.4 mm.
Stereolithography (SLA)
Materials: Photopolymers in liquid form.
Applications: Highly detailed prototypes, dental and jewelry pieces.
Layer Thickness: Between 0.025 mm and 0.1 mm.
Selective Laser Sintering (SLS)
Materials: Nylon and polyamide in powdered form.
Applications: Durable pieces with intricate shapes and geometries.
Layer Thickness: Between 0.05 mm and 0.15 mm.
Direct Metal Laser Sintering (DMLS)
Materials: Metals including titanium, stainless steel, and aluminum.
Applications: Tools for the aerospace industry, medical implants, and custom tools.
Layer Thickness: Between 0.02 mm and 0.05 mm.
Digital Light Processing (DLP)
Materials: Resin-based photopolymers.
Applications: Detailed pieces that require a smooth finish.
Layer Thickness: Between 0.01 mm and 0.1 mm.
Additive manufacturing can cater to almost any sector or project requirement by modifying the techniques and processes.
CNC (Computer Numerical Control) machining is a form of manufacturing called a subtractive process. It is highly accurate, precise, and repeatable. CNC machining can utilize cutting, shaping, and even laser-based cutting to eliminate material from various substances, including wood, plastic, and metal. It is incredibly effective when producing prototypes, as it can replicate the appearance of the end product with great detail.
Key Features and Benefits:
High Accuracy: CNC machines have tolerances of around ±0.005 mm, providing exceptional accuracy.
Material Versatility: CNC machines can utilize a variety of components such as steel, aluminum, PEEK, acrylic, and brass.
Rapid Turnaround: Very low and average volume production is achievable quickly.
Scalability: The machines can be adjusted to create single items and large volumes.
Typical Applications in Prototyping:
Functional Testing—Prototypes created with a CNC machine can be helpful in mechanical or thermal testing, as their material features can be drastically altered.
Visual Models—Coating and polishing make restyling prototypes feasible, providing smoother finishes for better aesthetics.
Tooling and Fixtures – The equipment can create jigs, molds, or even fixtures for advanced production processes.
Technical Parameters:
Accuracy Tolerance: Based on the machine being used and the material, the accuracy tolerance can vary between ±0.01 mm and ±0.005 mm.
Cutting Speed: 240-360 m per minute when using the CNC machine with aluminum as the material.
Surface Roughness (Ra): Can be as low as 0.8 µm for polish grades.
Max Part Size: This is adjustable depending on the kind of machine, up to 1000 x 500 x 500 mm for most conventional CNC machines.
Utilizing CNC machining technologies in prototyping allows engineers to reproduce their designs accurately, improve performance testing, and speed up the cycle time for producing quality end products.
In my experience, injection molding has proved exceptionally beneficial for mass manufacturing components after prototyping. After completing the prototype with CNC, switching to full-scale production with injection molding is easy. This method saves time, is cost-efficient, and is easy to use regarding material flexibility. Its strength lies in creating complex geometries in large quantities while upholding precision.
Key Technical Parameters for Injection Molding:
Clamping Force: This usually ranges from 20 to 5000 tons, which varies depending on the part size and materials used.
Part Tolerance: Achievable tolerances can fall within ±0.005 inches (±0.127 mm) for precise applications.
Cycle Time: This is usually between 10 and 60 seconds, depending on the part complexity and the cooling needed.
Material Compatibility: This can produce a wide variety of thermoplastics, which include ABS, PC, and PP, as well as some thermosets.
Combining CNC prototyping and injection molding allows companies to control their production schedules more effectively while maintaining precision and quality.

Accelerated Development: Accelerated development facilitates converting ideas into functioning models, as rapid prototyping allows for fast iteration.
Improved Design Validation: Reduces costly design changes during production as design flaws are identified early due to the use of physical prototypes.
Enhanced Communication: Bridges the understanding gap between stakeholders, engineers, and clients as tangible models improve cooperation and collaboration.
Cost Efficiency: This method saves resources during development, as flawed designs are prevented from being tested earlier in the concept stages.
Customization and Innovation: Encourages creativity and tailored solutions as it quickly facilitates experimentation with various design iterations.
Accelerated Prototyping: Methods such as 3D printing allow us to prototype much faster. With these technologies, we can shrink production times from weeks to hours. This makes it possible to do a more significant number of iterations within a given time frame, consequently reducing market time.
Improved Design Accuracy: CAD software and other sophisticated manufacturing tools allow designers to control measurements and tolerances to levels as low as ±0.01 mm. This level of precision helps guarantee that the intended concepts are realized as designed.
Risk Mitigation: Developing thermal or structural prototypes early enables us to conduct tests that expose potential problems before large-scale production. For example, real-world thermal or structural analyses can be performed through simulations to verify if the prototype is durable and reliable.
Efficient Resource Allocation: Selective simulators and prototypes use materials more efficiently, eliminate waste, and save money. Softer materials such as aluminum or ABS plastic are usually used in the initial testing stage of more aerodynamically complex designs.
Enhanced Collaboration Tools: The cloud and other digital platforms that allow file sharing aid in capturing design and promote remote interchange of ideas, thus providing instant feedback to users. This greatly enhances productivity by improving communication and decision-making processes.
These factors, working together, show how holistic approaches to prototyping and testing enhance innovation, help conserve resources, and mitigate risks during the product development life cycle.
Prototyping serves a significant purpose in design validation by providing an avenue for teams to determine functionality, evaluate realistic expectations, and obtain feedback from users at an early enough stage. It also facilitates iterative testing to identify possible flaws, assess how well a structure is built, and modify defined design features to meet project objectives. Some of these elements which assist in validating designs are best explained in the following:
Functionality Verification: Teams can create a physical or digital model to check how some functions are conservatively described as moving parts like rotation, weight-bearing, and communication between different software applications. This exercise further improves the design and establishes if the output is satisfactory. An example can be setting a rough machine part with tolerances of 0.01 inches +/- during its prototyping level.
End-User Assessment: Prototyping allows end users to interact with a model that effectively provides information about ergonomics and usability. Feedback from surveys or eye-tracking studies can be measured and used to improve the design, ensuring that the end product is friendly.
Testing Candidate Materials: This prototype stage can test materials to simulated conditions such as stress, extreme temperatures, and environmental exposure. For instance, testing ABS plastic for a prototype at temperatures of -20 C to 80 C ensures its use during the application is durable.
Prototypes help avert full-scale production mistakes, which can be expensive, as obsolete design issues are already addressed in the earlier stages. Advancements in digital technologies, including CAD tools and 3D printers, increase the speed of iterations, thereby reducing material and time wastage in manufacturing processes. \n\nWith these techniques implemented, prototyping goes a long way for validation, resulting in optimally functional, easy-to-use, and commercially usable products.
Because iteration enables us to test, refine, and optimize in stages, it helps decrease design flaws. Prototyping tools such as CAD software and rapid 3D printers allow us to address problems much earlier and implement practical improvements. Some critical technical parameters to assess during iteration cycles are dimensional accuracy (tolerance value of ±0.1mm), material features concerning expected load stress, and usability measures based on user feedback. The product is guaranteed to meet functional needs and practical objectives through efficient refinement based on these factors.
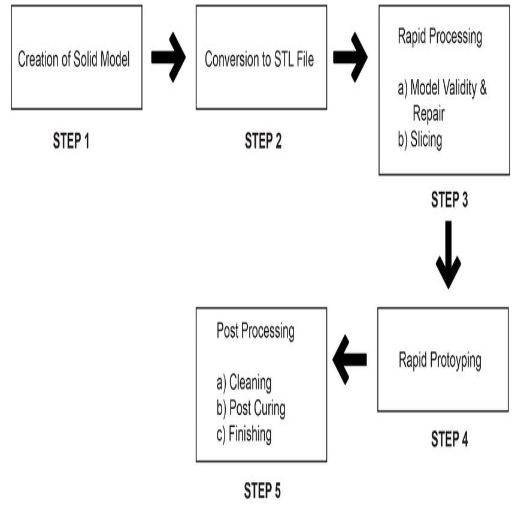
A digital model, usually drafted in CAD software, is the starting point of a rapid prototyping process. This model acts as a guide to the prototype that needs to be made. The design is then sent to a 3D printer or any other rapid prototype machinery capable of building the prototype using resin, metal, or plastic. The machine works on it layer by layer. The prototype then goes to production, testing, evaluation, and feedback analysis for any changes that could be made. This cycle can be done repetitively to reach the best possible end product.
Conceptualization and Design
Start with preparing a detailed 3D CAD model. The model should be fully functional and have the design’s dimensions. The model’s Resolution is a key technical parameter. In most cases, resolution ranges from 0.01 mm to 0.1 mm, which is standard.
Preparation for Prototyping
Convert the prototype CAD design into STL or OBJ files. These files make it easier for the rapid prototyping machines to work with them. The next step involves slicing the model for layering. The layer thickness usually depends on the detail level and is between 0.025 mm and 0.1 mm.
Selection of Materials and Their Machining
Select materials like ABS, PLA, resin, or metal according to the prototype’s function. The machine builds the prototype using additive methods – it assembles the prototype layer by layer. Key technical parameter: Material characteristics like tensile strength and melting temperature must be by the design requirements.
Post-Processing
Conduct any sanding, painting, construction, or assembly that refines the prototyping fabrication. The key technical parameter is that finishing tolerances must meet the design’s functional limits (±0.1 mm standard precision).
Evaluation and Testing
Evaluate the prototype’s performance capabilities, durability, and design accuracy. Functional prototypes often undergo stress testing or exposure to simulated environmental conditions. Key technical parameter: Validate that the prototypes achieve pertinent performance standards for the expected purpose.
Iterative Refinement
Integrate comments received from the evaluation to modify the design. Repeat the prototype cycle until all of the product specifications are achieved. Key technical parameter: Modify the CAD files and document design changes in a revision control system for record purposes.
Following all the steps alongside their relevant detailed technical parameters renders the process of rapid prototyping accurate and effective, fostering innovation along with successful product design and development.
Refining the concept through design iterations is instrumental in systematizing any product. Redesigns analysis and refinement processes enable teams to identify issues, improve efficiency, and achieve user requirements. These cycles also quickly tackle unknown risks that may be detrimental in the later stages of production to save money and reduce risk.
Design Iterations Facilitate:
Improved Product Quality
Design iterations allow us to meet user needs, expectations, and performance standards. After each test cycle, functional and technical challenges are addressed in every iteration.
Timely Problem Recognition
Identifying design flaws can happen before a product is finalized. This avoids additional work when the product aims for bulk production through expensive redesigns.
User-Driven Design
Every cycle integrates user feedback, tailoring products to meet customer needs, expectations, and preferences.
Cost Effectivity
While taking time in the long run, transitioning to production-capable designs streamlines the process, resulting in fewer resources spent.
Design Parameters to Keep in Mind:
Precision in Measurement
Ensure that design size, contour, and tolerances captured in device CAD files are exact and are in order after every iteration.
Depending on the use case, mechanical parts tolerances must be maintained at ±0.3 mm.
Material Evaluation
Perform stress and environmental tests to check if the material is still durable after changes.
Parameter: Measure maximum tensile strength, thermal endurance, and fatigue resistance per industry norms.
Prototyping Accuracy
Check that all prototypes as built incorporated valid changes to the set specification after each iteration.
Parameter: Confirm all test prototypes correspond with the most recent CAD file.
Record Keeping and Audit Trail
Keep up to date a record of all design changes, tests performed, and associated comments from the different stakeholders to facilitate correspondence and compliance within the set timeframes.
Parameter: Track all changes made during each iteration using PDM software, starting with Part Number Version Control.
By prioritizing design iterations within relevant technical parameters, innovation can be enhanced, risks minimized, and value maximized for the end user. This allows the teams to deliver products ready for the market.
To convert 3D models into working prototypes, I follow a systematic and iterative approach. First, I validate the CAD-based 3D design by cross-checking it against industry standards. Then, based on the prototype’s material requirements and intended purpose, I select a suitable manufacturing process like 3D printing, CNC machining, or injection molding. After that, I manufactured the prototype to ensure it met the specified tolerances and dimensions outlined in the CAD model. After fabrication, I conduct functionality, durability, and design tests to evaluate the effectiveness of the prototype.
Technical Specifications:
Material Selection: Choose the materials that best satisfy the prototypes’ structural, thermal, or aesthetic functionalities (e.g., use ABS when durability is necessary or PLA when rapid prototyping is required).
Tolerances: For critical parts, the accuracy of dimensions must be within ±0.1 mm.
Testing Metrics: To evaluate the prototype’s efficiency, establish baseline indicators that include, but are not limited to, load bearing and resistance to the elements.
Iterative Changes: Based on the tests conducted, change the CAD designs and ensure all changes are logged in the revision filing cabinets.
This method guarantees a seamless shift from a digital representation to an actual product while effectively fulfilling the objectives of the design and its practical implementation.

Be sure to account for the project’s primary objective, available materials, and budget when selecting the most appropriate prototyping technique. Complex geometries or high precision are best suited for CNC machining and SLA 3D printing. FDM printing and vacuum forming are effective when speed and cost-effectiveness are prioritized. The method chosen should validate the prototype’s intended purpose, whether it is aesthetic verification, functional validation, or proof of concept. Always ensure scalability and production feasibility are included so that if the process needs to switch to mass production, it can be done effortlessly.
Choosing the proper manufacturing method involves a combination of technical, economic, and practical considerations. Below are key factors to evaluate and their corresponding technical parameters:
Material Compatibility
Ensure the chosen method is compatible with the physical and chemical nature of the material. For instance:
Metals (aluminum, steel): CNC machining, casting, and metal injection molding. Plastics (ABS, PLA): Injection molding, FDM 3D printing, and vacuum forming. Composites or specialty materials are best served with niche methods like carbon fiber layup or SLS printing.
Production Volume
Choose a method that is appropriate for the required volume of production:
Low volume production: Additive manufacturing (SLA, FDM), CNC machining. High volume production: Injection molding and die casting.
Precision and Tolerances
Identify the accuracy needed for the product:
CNC machine work and SLA 3D printing require a high accuracy of ±0.01mm.
FDM 3D printing and vacuum forming require moderate precision (± 0.1 mm or more).
Cost Efficiency
Consider the initial tooling/setup payment against the payment for each unit produced:
Die casting and injection molding have high initial payments but low per-unit values, which makes them ideal for mass production.
CNC machining and additive manufacturing have low initial costs and are ideal for prototyping or small batches.
Speed of Production
Think about the time it takes to complete the constructs and the final product:
SLA and FDM printing with CNC machining are suitable for rapid prototyping and take only a few days.
Casting and injection molding take months because of the extended setup time and slow output.
Surface Finish Requirements
The required quality of the finish should be equal to what is necessary for the end use:
Smoothing SLA and DLP prints require a fine surface finish, while FDM prints and CNC machining require a functional grade finish.
Structural and Functional Integrity
For parts that require considerable mechanical strength or specific load tolerances, the recommended method is to cast, CNC machine, or 3D print the metal, with accompanying stress tests and material certifications.
Considering these parameters, you can select a method to complete your project in time and provide the appropriate quality.
Aspects like the application, material, manufacturing method, and any other scope of work requirements need to be effectively assessed while accomplishing a surface finishing and precision evaluation task. The objective is to achieve maximum utility, beauty, and economic value while observing the prescribed technical criteria.
Surface Finish Measurement
A surface finish quality assessment is quantified with roughness indicator values like Ra, which defines average roughness.
Fine finish (~ 0.4 – 3.2 µm): Used in esthetic or sealing surfaces. Achieved with SLA, not 3D printing, polishing, or any post processes.
Medium roughness (Ra ~ 3.2 – 12.5 µm): Suitable for functional parts and general-purpose use. Usually done with CNC machining or FDM 3D printing.
Coarse finish (Ra > 12.5 µm): Often used for internal structures or non-critical surfaces. Sand casting or low-resolution printing produces this.
Dimensional Precision
Dimensional accuracy relies upon the manufacturing system and its tolerances:
High precision (±0.005 mm): Attainable by CNC machining or metal 3D printing for complex geometry with tight tolerances.
Moderate precision (±0.1 mm): Frequently found with SLA/DLP 3D printing or standard injection molding. Adequate for many functional components.
Lower precision (±0.5 mm or more): Common in non-critical or large bulky parts, typically associated with FDM printing or casting.
Material Compatibility
Surface quality and accuracy are impacted by different types of materials, which include:
Metals such as aluminum and steel. Compared to other methods, these tend to have smoother finishes and tighter tolerances when undergoing CNC machining or precision casting.
Plastics: This category benefits more profoundly from SLA printing or injection molding than FDM. Post-processing procedures like sanding or vapor smoothing improve the results further.
Composites are more challenging as they require particular machining processes that do not compromise fibers while maintaining dimensional accuracy.
By carefully selecting the right mix of manufacturing techniques and post-processing, you can attain the surface finish and precision needed for your project. These variables must be balanced against the required end-use to set the ideal production approach.
My primary concern when choosing a manufacturing process for intricate geometries is that the process can achieve high accuracy and preserve the part’s functionality. For complicated designs, 5-axis CNC machining is often the best choice as it provides access to tight angles and undercuts while achieving tolerances of approximately +/− 5 thousandths of an inch. For Stereolithography (SLA) or Selective Laser Sintering (SLS) Additive manufacturing, the ability to produce detailed features and internal cavities with layer thicknesses of 50 microns to 100 microns is greatly facilitated. For casting, introducing split lines accompanied by draft angles between one degree and three degrees improves the ease with which the mold can be removed. Combined with the preferred method, these parameters solve complex designs, reducing flaws and improving production efficiency.
Leading CNC Metal Machining Provider in China
A: Rapid prototyping offers several advantages over traditional methods. It allows for faster iteration and design changes, reduces costs associated with conventional manufacturing, and enables the creation of complex geometries that may be difficult to produce using traditional methods. Rapid prototyping also facilitates the early detection of design flaws, accelerates the product development process, and allows for the quick production of physical models for testing and evaluation. These advantages help bring products to market faster and more efficiently.
A: A 3D printer is a crucial tool in rapid prototyping. It uses additive manufacturing technology to create physical models layer by layer based on digital 3D designs. This allows for the quick and efficient production of prototypes without expensive tooling or molds. 3D printers can work with various materials, creating functional prototypes that resemble the final product. They are handy for iterative design and testing early in the development process.
A: Several rapid prototyping techniques are commonly used in product development. These include Stereolithography (SLA), Fused Deposition Modeling (FDM), Selective Laser Sintering (SLS), and Digital Light Processing (DLP). Other methods include PolyJet, Laminated Object Manufacturing (LOM), and Rapid Injection Molding. Each technique has strengths and is suitable for different applications, materials, and prototype requirements. The choice of technique depends on factors such as desired accuracy, material properties, cost, and production speed.
A: Rapid prototyping contributes to efficient product development by allowing designers and engineers to create and test their concepts’ physical models quickly. This enables early detection of design flaws, reduces the time and cost associated with traditional manufacturing methods, and facilitates faster iterations. Rapid prototyping also allows for creating functional prototypes that can be used for testing and validation, helping to refine the design before moving to full-scale production. This iterative approach leads to better products and a more streamlined development process.
A: In rapid prototyping, additive manufacturing (3D printing) involves building a model layer by layer, adding material only where needed. This process is efficient and allows for complex geometries. On the other hand, subtractive manufacturing starts with a solid block of material and removes excess material to create the desired shape. While subtractive methods like CNC machining can be precise, they often result in more material waste and may have limitations in creating specific complex shapes. Additive manufacturing is generally more associated with rapid prototyping due to its flexibility and efficiency.
A: Rapid prototyping helps bring products to market faster by significantly reducing the time required for design iterations and testing. It allows for quick production of physical models that can be evaluated and refined early in the design process. This early detection of issues and the ability to make rapid changes reduces the likelihood of costly modifications later in the development cycle. Additionally, rapid prototyping enables faster communication of ideas with stakeholders and potential customers, facilitating quicker decision-making and approvals. All these factors contribute to a shortened overall product development timeline.
A: Several factors should be considered when choosing rapid prototyping services for a project. These include the service provider’s expertise with different rapid prototyping technologies, their range of materials, ability to meet required tolerances and surface finishes, turnaround time, and cost. It’s also important to consider their capacity for handling your project size and complexity, quality control processes, and ability to provide support throughout the prototyping process. Additionally, consider whether they offer any post-processing services and if they can assist with design optimization for rapid prototyping.

Manufacturing processes are quite complex, and the choice of a production method is directly related
Learn More →
There are two major manufacturing methods for producing plastic prototypes that most people find useful
Learn More →
As a person involved or interested in the design and production of plastic components, it
Learn More →