

Manufacturing processes are quite complex, and the choice of a production method is directly related
Learn More →
DIY anodizing aluminum at home in Los Angeles is often considered daunting, but fear not! This post will help you analyze its feasibility and estimate step-by-step resources needed to accomplish anodizing at home. With adequate information and the proper techniques, anodizing airplane-grade aluminum can be a fruitful and thrill-seeking venture. Anodizing is a handy form of plating that will be useful not only for private enthusiasts but also for small businesses that require enhancement of product resistance to corrosion. This article will discuss the tools and materials needed and analyze the science behind anodization and the process. Besides that, we will investigate several issues that come up with anodizing and try to suggest ways to do it professionally. By the end of this post, you should be familiar with the anodizing mesh process and have the confidence to do it solo.
Anodizing is a technique for increasing aluminum’s surface value by enhancing its corrosion-resistant oxide layer. The method involves immersing aluminum in an acidic electrolyte solution and running a current over it. Oxygen ions amalgamate with aluminum to form a protective oxide layer, which can be enhanced by dying or leaving clear. The layer can be improved by dying it or left clear while providing multilayered appeal, modified durability, and enhanced corrosion and wear resistance.
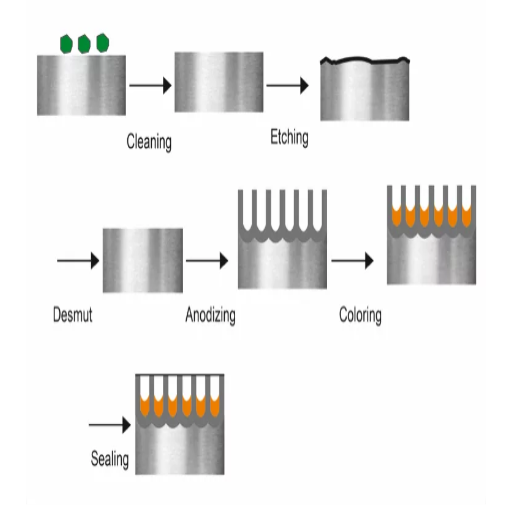
The electrochemical procedure of anodizing aluminum requires the following actions and parameters for the protection coat to be effective and successful. In addition, as follows is a brief explanation with relative technical factors:
Preparation: As the stage suggests, the surface of aluminum must be thoroughly cleaned to eliminate any residues. This is done using alkaline or acidic cleaning solutions.
Parameter: Cleaning temperature lies between 45 and 60 degrees Celsius.
Electrolyte Solution: The process would not occur without an acidic electrolyte, but sulphuric acid is the most common. Chromic acid can also be used in some cases.
Parameter: The sulphuric acid concentration is estimated to be approximately 15-20 pounds per weight.
Voltage and Current: An external direct current (DC) power supply is connected to aluminum, which acts as an anode in the circuit and forms an oxide layer.
Parameter: The voltage supplied is usually between 12V and 24V, depending on the thickness of the desired oxide layer.
Current density: Approximately around 1.5 to 3.0 A/dm².
Temperature Control: The electrolyte bath’s temperature must be controlled to achieve uniform coating quality.
Parameter: The optimal temperature is around 15°C to 20°C.
Duration: The amount of time the material is left to immerse dictates the thickness of the oxide layer and can be modulated to meet specific needs.
Parameter: Generally, the process takes between 20 and 45 minutes.
Sealing: Aluminum is commonly anodized and then subjected to a sealing process to close the oxide layer’s pores, improving corrosion resistance.
Parameter: The sealing process is done by immersion in deionized water heated to a temperature around 95°C to 100°C for 15-30 minutes.
These parameters should be controlled carefully during each process stage to achieve anodized quality that meets functional and aesthetic needs.
As the most frequently employed electrolyte for sulfuric anodization, sulfuric acid is crucial in anodizing operations. When aluminum is immersed in a sulfuric acid solution with an electric current, the acid helps in the electrochemical reaction, forming a porous layer of Aluminum oxide on the surface of aluminum. The weight percentage of sulfuric acid is usually 10 to 15 percent, while the electrolyte temperature is kept between 20 ̊C and 25 ̊C for uniform and controlled oxide formation; the current density parameters are usually 12 to 18 A/ft². The time required for the process also changes between 15 to 60 minutes based on the thickness and application of the oxide layer.
In the case of other compounds used for anodizing, those that can serve as modifiers or may be used in pretreatment or post-treatment steps. Let’s look at some examples:
Phosphoric Acid:
It is often employed in oxide layer adhesion pretreatment to clean or condition aluminum surfaces. The concentration is typically around 10-20% by volume.
Organic Acids and Dyes:
Some organic acids, such as oxalic acid, can be used to anodize alternative electrolytes for specialty finishes. Dyes are used in a secondary step to penetrate and stain the porous aluminum oxide and stain it.
These chemicals, if dosed accurately and used within the correct tolerance limits, guarantee that anodizing will satisfy both the physical and visual parts of the problem. The chemical parameters must be controlled and obeyed to ensure repeatability, reliability, and safety.
Cleaning Agents:
Surface finishing requires alkaline etching agents, such as sodium hydroxide, at a concentration of four to six percent to remove contaminants and enhance the quality of the finish.
Sealants:
Nickel acetate or cobalt salts are often added to the sealing steps of anodizing as these chemicals further improve corrosion resistance and strengthen the protective coating of the oxide layer.
In my opinion, anodizing significantly improves resistance to corrosion by building a formidable barrier in the form of an oxide layer, protecting against moisture and chemicals. This protective layer is uniform, non-conductive, and highly adherent, preventing issues like flaking or peeling. Also, anodizing improves surface hardness, increasing the material’s resistance to abrasion over time.
From a technical perspective, the most effective results are achievable under the following conditions:
Electrolyte Concentration: The sulfuric acid concentration is usually kept between 15-20% by weight for ideal oxide production.
The voltage used for anodizing usually ranges between 12 and 25 volts, depending on the coating thickness required and the material type.
Temperature Control: The temperature of the electrolyte bath should be maintained within 20-22 degrees centigrade to guarantee some degree of accuracy.
Time: This process’s cycle time is usually around 15 – 60 minutes, depending on thickness requirements.
Sealing Step: After anodizing, the component should be sealed in hot water or a nickel acetate solution to close pores and increase resistance to corrosion.
With these parameters, anodizing balances functional strength, cosmetic appearance, and robust parts for demanding applications, making it the preferred surface finishing technique.

Following these steps, you can safely and successfully anodize aluminum at home, achieving a durable and attractive finish.
For the successful anodizing of aluminum components at home, the tools and materials needed, together with their specific details, are:
Workpiece Made of Aluminum
Use clean, good-quality aluminum suitable for anodizing like 6061 or 5052 alloys.
Power Supply
A DC power source with adjustable voltage and current output may be preferred. Workpiece size will determine the recommended 12-24 volts and 5-10 amps range.
Electrolyte Solution
A blend of distilled water and sulfuric acid with a concentration ranging between 10 and 15 percent. Acid should always be added to water and not the other way around.
Anodizing Tank
It is recommended that the workpiece and electrolyte be stored safely in a well-sized plastic or acidic-resistant container that is deep enough for the object to move freely.
Cathode Material
Comparable to the workpiece, a lead or aluminum sheet can serve as a uniform anodizing cathode.
Distilled Water
Distilled water is necessary for rinsing, sealing, and preparing tiles and electrodes. Tap water should be avoided, as it could contain impurities that interfere with the work.
Agitation System (Optional)
Stirring or bubbling frames could aid in keeping uniform electrolyte temperatures and enhance the anodizing quality.
Heating Element (For Sealing)
The anodized surface is sealed with a heat source (such as a kitchen stove) and a pot for boiling distilled water.
Safety Gear
To work safely with the electrolyte solution, acid-proof gloves, goggles, and a protective apron are mandatory.
Precise Measuring Tools
The scale for measuring acid concentration and a multimeter for the voltage/current measurement during the anodization process.
With these tools and specific parameters, the quality of an anodizing process can be accomplished efficiently and professionally.
Select the Anodizing Tank
Pick a tank made of a nonreactive material, such as polypropylene or polyethylene. The tank’s size should permit the complete immersion of the workpiece while having sufficient volume to accommodate the flow of the electrolyte.
Formulate the Electrolyte Solution
Take an anodizing electrolyte such as sulfuric acid in 15-20% solutions by volume. Add concentrated sulfuric acid to distilled water, but do not use it in reverse order, as doing so will warrant hazardous complications.
Establish the Power Supply
Connect the DC power supply to regulate the specific voltage and current you need. Use an initial voltage of 12-18 volts, paying particular attention to the anodizing needs and the aluminum alloy. The ideal current density for optimal performance is between 12 and 24 amps per square foot (ASF) surface area.
Attach the Cathode
Insert a cathode, such as a lead plate or stainless steel, along the sides of the tank. Ensure it is suspended at a uniform height from the workpiece for the most consistent current flow.
Clean The Workpiece
Degrease the aluminum piece to remove any foreign materials. An alkaline degreaser followed by a water rinse will do the job. To better etch the materials, apply a 5-10% sodium hydroxide solution for 1-5 minutes, neutralizing with an acid despot solution afterward.
Complete Electrical Connections
Securely fasten the workpiece to the anodizing rack with aluminum or titanium wiring. Ensure good electrical contact so there is no disconnection during the procedure. Then, connect the workpiece to the circuit as an anode.
Submerge The Workpiece Beyond The Surface
Pour the electrolyte solution into the tank while leaving some room to avoid overflowing it. Place the aluminum workpiece underneath the electrolyte solution’s surface while ensuring it does not come in contact with the cathode.
Begin Anodizing Process
With the power supply enabled, increase the current until the desired level is reached. For optimum results, this should take 30 to 60 minutes. The process can be prolonged for thicker oxide layers between .0005 and .001 inches thick. The solution temperature should not exceed 72°F (20-22°C), and the voltage and temperature should be regularly checked.
Rinse and Seal the Workpiece
After the anodizing process, lift the piece from the tank and rinse it with cold distilled water. To seal the oxide layer and make it more durable, boil the workpiece in water or a nickel acetate solution for 15-30 minutes.
By mastering these steps and carefully controlling the variables, one can obtain a smooth and strong anodized finish that can be used for multiple purposes.
In any anodizing project, safety avoidance is my most important concern. I first verify that I have the required personal protective equipment (PPE), such as gloves, safety goggles, and a lab coat to protect me from dangerous chemicals, including sulfuric acid. Another consideration is a well-ventilated space to reduce fumes since anodizing solutions can produce hazardous gases when heated. It’s also vital to note that distilled water needs to be used so that no impurities that would affect either the chemical reaction process or the final finish remain in the water.
During the anodizing stage, I make a point to check my voltage and current levels; generally, for sulfuric acid anodizing, I set my voltage to be between twelve to eighteen volts DC while concurrently ensuring my current density is at a steady twenty to thirty amps for every square foot (ASF). For the anodizing bath, keeping accurate temperature control within the specified limits, sixty to seventy-five degrees Fahrenheit (16 to 24 degrees Celsius), is another critical safety precaution to prevent overheating or undesired reactions within the tub. To complete the procedure, I am careful with all chemicals, including neutralizers, ensure proper waste disposal as required by law, and have a spill kit on hand for emergencies. Taking all these measures provides a smooth and safe anodizing process.
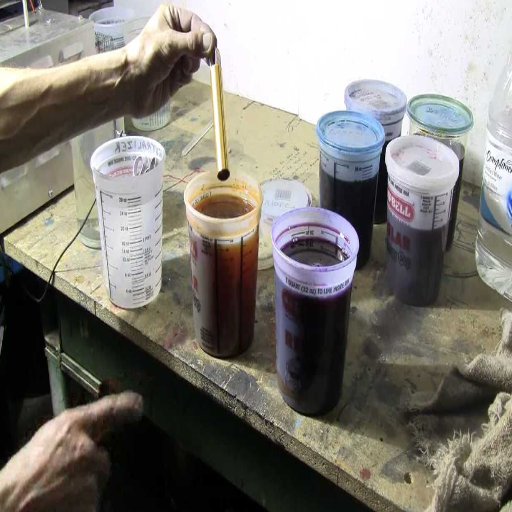
Indeed, anodized aluminum can be dyed easily. After anodizing, which results in a porous surface, the aluminum is submerged in a dye bath, where the pores fill with the corresponding color. This procedure allows for natural to vivid colors. After accomplishing the designated color, the aluminum is sealed for durability, which locks in the dye.
Aluminum’s functional and aesthetic properties can be improved by performing anodizing processes, which are capable of dyeing the aluminum in various colors. Standard designs include black, bronze, purple, silver, blue, red, green, and many more. These colors can be attained by customizing through dyes and adjusting their concentration and immersion duration.
Parameters that describe how the color can be obtained:
Bronze: architectural use Bronze is achieved by a mixture of electrochemical coloring methods and baths of organic dyes.
Gold: Guarantees a luxurious and sturdy finish produced by electrolytic coloring using metal salt.
Silver (Natural Anodize): This doesn’t require additional dyes and, thus, is pretty popular in industrial settings.
Blue, red, and vibrant green: Using organic dyes and strictly controlled immersion time (5-10 min) guarantees precisely achieving such colors.
After the dyeing step, sealing improves the life expectancy of colors by ensuring UV and wear resistance. Each application has specific requirements for obtaining the best durability and optimal performance.
The dye process improves the aesthetic and mechanical properties of aluminum parts by enhancing the appearance of the surface with vibrant, durable finishing. When anodizing, I ensure that aluminum surfaces have open pores that can be thoroughly treated with dyes. Afterward, these surfaces are sealed to protect the colors from UV radiation and abrasion. Important operational factors consist of:
The thickness of the anodizing layer is usually 10–25 microns to guarantee optimal dye absorption and high durability.
The immersion time in the dye bath is 5–10 minutes for homogeneous and vivid colors.
Sealing temperature: 190–212°F (88–100°C) provides better color sealing and higher protection from wear and corrosion.
These not only make the part’s fading and environmental stress resistance unforgettable but also provide a long-lasting, appealing finish and extend its usability in many applications.
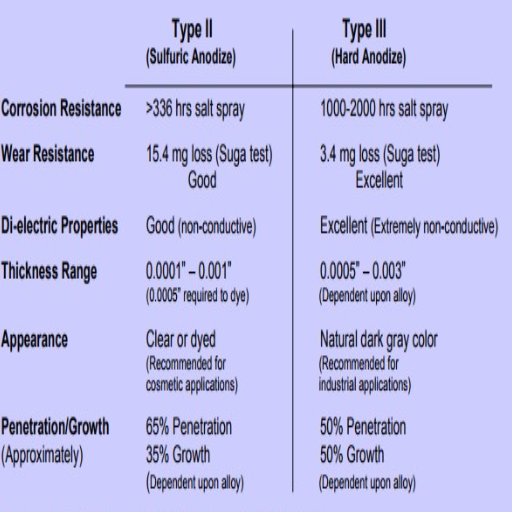
Type I – Chromic Acid Anodizing
This method uses chromatic acid for anodizing, producing a softer and thinner anodized layer. It is primarily helpful for thin aerospace and military applications where there is a need for superior corrosion prevention.
Type II – Sulfuric Acid Anodizing
This is the most common and widely used method. It is helpful for decorative finishes when a thicker anodized layer is needed. The anodized material can be dyed into various colors without substantially losing its durability or corrosion resistance.
Type III – Hard Anodizing (Hardcoat)
This type produces an exceptionally thick and hard anodized layer compared to the other types. Because such components need better wear resistance and durability, they are used in industrial, automotive, and military applications where higher mechanical stress is expected.
Each type of anodizing can be used for different functional and aesthetic purposes, proving aluminum’s versatility across industries.
To provide a clear comparison of the anodizing methods, the following table outlines their key characteristics and technical parameters:
|
Type |
Anodizing Process |
Layer Thickness |
Corrosion Resistance |
Features |
Uses |
|---|---|---|---|---|---|
|
Type I |
Chromic acid |
0.5 – 2.0 microns |
Moderate |
Lightweight, thin layer, non-conductive |
Aerospace applications where weight is critical |
|
Type II |
Sulfuric acid |
5 – 25 microns |
High |
Dyeable, decorative, and durable |
Architecture, consumer goods, and electronics |
|
Type III |
Hard anodizing (sulfuric acid) |
25 – 150 microns |
Very high |
Extremely hard, wear-resistant, and thick |
Industrial, automotive, and military components |
Essential Points to Adhere To:
Hardness and thickness of a layer.
Type I anodizing is the most suitable option for applications with low coating weight, as it has the thinnest layer. In contrast, type III is best for high wear and mechanically stressed environments because it generates the thickest and hardest coatings.
Protection from corrosion
All types of coatings provide corrosion protection to some degree. However, Type II and III excel with their thick and durable layers, and Type III gives the most protection even in harsh conditions.
Functional Goals Versus Aesthetic Goals
Type I is typically used for low-weight parts, whereas Type II is for aesthetic finishes that require color. Type III is appearance-driven and more challenging than the others.
This type of comparison analysis captures the various applications and advantages of each anodizing, helping users decide based on their needs.
Complex anodized industrial processes have numerous features that can be used when considering the most challenging industrial conditions. For example, in aerospace, automotive, and marine engineering, components like pistons, hydraulic cylinders, or valve bodies are anodized to enhance their performance and durability. Wear resistance and corrosion protection are added in such processes, creating a long-lasting, valuable part.
With mechanical engineering methods applied, hard anodization uses low-temperature electrolyte baths (often sulfuric) with a temperature of about 32°F (0°C) and a current density of 20-40 A/ft². The impressive hardness levels of the created coatings often exceed 400 HV (Vickers Hardness). It is also worth mentioning that the coating thickness achieved ranges from 25 to 150 microns, which, together with the dense protective oxide layer that withstands extreme mechanical stress and harsh environmental conditions, makes it an excellent choice for parts exposed to abrasive or corrosive substances.
By forming an oxide layer on the surface of the metal, anodizing aids in metal finishing as it prevents corrosive oxidation. This oxide layer protects the material from damaging environmental factors and aids in corrosion and wear resistance, making it suitable for various industrial applications. Moreover, the anodizing process increases the aesthetic value by creating a uniform surface that can be easily dyed and improving the adhesion of paints and coatings. The metal’s natural texture is preserved while its lifespan and performance are enhanced, allowing it to withstand more demanding conditions.
The oxide layer, especially aluminum oxide in anodized aluminum alloys, is known to have excellent hardness, often with values of 400-600 HV, depending on the alloy and process parameters. Anodized layers greatly enhance the lifespan of aluminum metal by making it more wear-resistant, forming a rigid, dense barrier on the surface. This astounding hardness improves the metal’s capability to withstand recurrent mechanical stress and abrasive contact without degrading the surface.
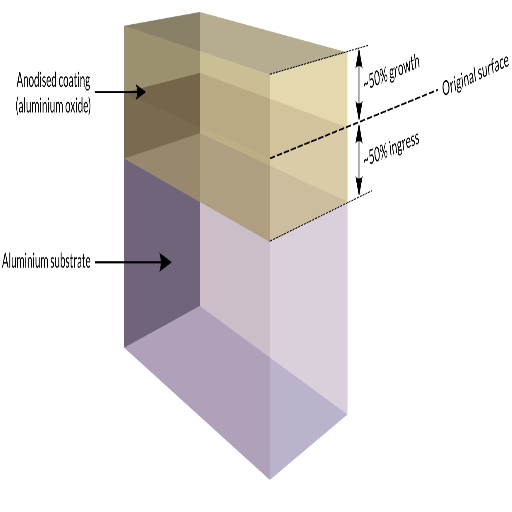
Moreover, the thickness of the anodized layer is adjustable, usually between 10 and 100 microns. High-oxidized coatings, such as those exceeding 25 microns, are applied to components that endure significant abrasive movements in aerospace, automotive, or heavy machinery. The anodized layer is porous and can thus absorb lubricants, further improving friction and wear reduction.
Above all else, the anodized layer protects metal parts from surface expansion due to friction, impact, or abrasive particles, significantly increasing the components’ lifespan. This is especially true in harsh environments. Thus, anodizing is a requisite surface treatment for industries where high quality and continuous reliability are expected.
Technically, anodizing aluminum increases its ability to resist corrosion, wear, and environmental damage. Anodization creates a hard, durable oxide layer that protects the aluminum while still being lightweight. Important details include:
Coating Thickness: 10-25 microns for corrosion resistance and 25-100 microns for wear resistance, depending on the use case.
Hardness: The anodized layer has a 300-600 HV hardness, making it useful for highly demanding tasks.
Porosity Allows dyeing or infusing lubricants, serving aesthetic or complementary functions.
Corrosion resistance: In neutral salt spray tests, aluminum coated with a coating can resist pitting when exposed to salty atmospheres for 1,000 hours.
With the adjusters put in the combiner, we finely tune the output for the anodizing process, which allows the material’s performance to be maximized within various industries from a reliability and durability standpoint for critical applications.
Leading CNC Metal Machining Provider in China
A: Anodizing is an electrochemical process that creates a durable, corrosion-resistant oxide layer on the surface of aluminum. This process enhances the metal’s durability, improves its appearance, and allows for color anodizing. Due to its protective properties and aesthetic appeal, anodized aluminum is often used in various industries.
A: To anodize aluminum at home, you’ll need a power supply, lead cathodes, acid-resistant containers, sulfuric acid, distilled water, a thermometer, and safety equipment. For color anodizing, you’ll also need dyes. While not strictly necessary, a machine like a small air pump can help agitate the solution.
A: Color anodizing involves dyeing the anodized aluminum surface. After the anodizing process creates a porous oxide layer, you can dip the part in a dye solution. The pores absorb the dye, and then sealing closes these pores, trapping the color. The final color depends on the dye used and the thickness of the oxide layer.
A: Safety is crucial when anodizing. Always wear protective gear, including goggles, acid-resistant gloves, and an apron. Work in a well-ventilated area and have a neutralizing solution (like baking soda) on hand. Never touch the part of the solution while the anodizing process is going on, and always add acid to water, never the reverse.
A: You can typically perform Type II anodizing at home. This type of anodizing is suitable for most decorative and mildly functional applications. Hardcoat anodizing (Type III) requires more specialized equipment and is generally not feasible for home setups. Type II anodizing creates a thinner, more porous coating ideal for dyeing.
A: The duration of the anodizing process depends on various factors, including the size of the aluminum parts, the desired coating thickness, and the current density used. Generally, the actual anodizing step can take 30 minutes to 2 hours. However, the process may take several hours, including preparation and post-treatment.
A: While it’s possible to anodize more significant parts at home, it becomes more challenging due to the need for larger tanks, more powerful power supplies, and maintaining consistent current distribution. For best results, start with smaller aluminum pieces and work your way up as you gain experience.
A: The surface of anodized aluminum is quite durable. Anodizing creates a hard, porous aluminum oxide layer integral to the aluminum substrate. This layer is resistant to wear, corrosion, and fading, making anodized aluminum an ideal choice for indoor and outdoor applications.
A: Common issues include uneven coating, poor color uptake, and surface defects. To avoid these, ensure thorough cleaning and etching of the aluminum surface before anodizing, maintain a consistent temperature and current density, and avoid touching the part during anodizing. Proper sealing after dyeing is also crucial for color retention.
A: While most aluminum alloys can be anodized, some are more suitable. Pure aluminum (1000 series) and 6000 series alloys generally anodize well and are ideal for home anodizing. Alloys with high silicon or copper content may be more challenging and result in a less aesthetically pleasing finish.

Manufacturing processes are quite complex, and the choice of a production method is directly related
Learn More →
There are two major manufacturing methods for producing plastic prototypes that most people find useful
Learn More →
As a person involved or interested in the design and production of plastic components, it
Learn More →