Fraud Blocker

How to Achieve a Smooth Finish on 3D Printed Parts: A Guide to Sanding 3D Prints

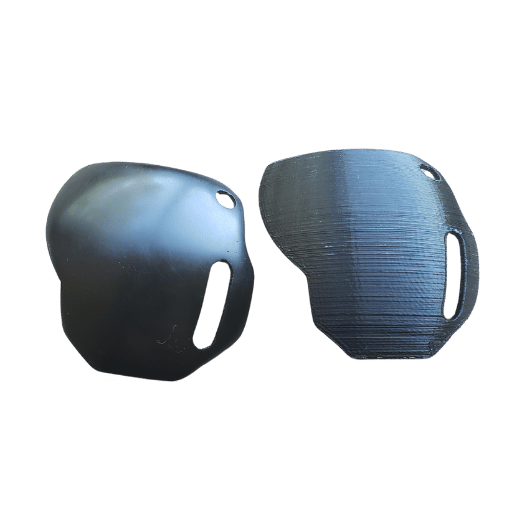
Smoothing out 3D printed components for a professional look is useful in improving their appearance and functionality, whether for a prototype, model or end-use part. They often require post-processing to turn 3D printed models which have a rough surface and layered texture to a smooth finish. One of the most effective techniques to refine 3D prints is sanding. Sanding can smooth rough surfaces into more visually pleasing sleek surfaces. In this guide, you will learn about the entire process of sanding starting from preparation of your print to the right selection of tools and materials. After reading this article, you will be equipped with knowledge and tips to help you achieve a great finish on your 3D printed parts regardless of your skill level.

Which Methods Would You Use to Sand Down 3D Prints?

Contents show

Which Methods Would You Use to Sand Down 3D Prints?

Selecting the Correct Sandpaper for 3D Printed Components

The selection of the sandpaper for 3D parts must take grit levels and sandpaper’s material characteristics into consideration. Start off with removing layer lines and other imperfections using coarse grits 100-200. Then switch to finer 400-600 for smoothing and refining the surface. For the final finish, polish it with even higher grits such as 1000 and above. It is suggested to make use of wet and dry sandpaper since the heat created impeded and filament material damage will not occur. The sandpaper itself should also be suitable for the print material, which might be PLA, ABS, or resin without causing unwanted scratches or wearing out the print material.

A Comprehensive Approach to Wet Sanding for Effective Surface Smoothing

  1. Step 1: Gather Your Tools. For the task, an assortment of wet/dry sandpaper differing in grit levels (e.g., 220, 400, 600, 1000, and higher), a clean cloth, a container of water, and a spray bottle are必need. If blasted with soap, it can act as a lubricant as well minimizing the strain of friction.
  2. Step 2: Use Finer Grit Sandpaper First. To sand away noticeable layer lines and imperfections, coarser 220-grit sandpaper can be utilized. When heat builds up during the process, soaking the sandpaper in water will be a significant aid as braiding will be smoother. To obtain the best results, circular motions must be constant while inching the paper forward.
  3. Step 3: Shift to Finer Grids Gradually. After all smoothening, progress to less coarse grits like 400 or 600 to perform final scratches. While the piece is wet, sandpaper will incrementally improve the surface along with ensure that all efficiencies are collected and a clear area around it.
  4. Step 4: Wash and Look at the Piece Often. To make a clearer surface assessment and get rid of any leftover pieces, the part must be washed. To avoid excessive detaining, washing clears the remaining pieces while permitting a clear gaze toward outlines, contours, and edges.
  5. Polish with High Grits for a Glossy Finish. For the final polish use sandpaper with grits of 1000 or higher. This step provides smoothness which is perfect for making 3D prints ready for the paint or sealant. Always keep an even amount of force and movement, as uneven patches may be created.
  6. Clean and Dry the Surface. The last step of sanding is to wash the part under a stream of water in order to eliminate any remaining abrasive materials. Then using a clean microfiber towel, carefully pat down the surface to get rid of water spots and ensure the surface is clean and ready.

If you properly follow these steps with the right materials, you will achieve a very fine surface on your 3D prints. Proper wet sanding not only sophisticated the appearance of the project but also the durability of the painted or coated surface.

The Elements of Achieving a Smooth Surface Finish

With the goal of perfect surface finishing, one must pay attention to the sanding sequence, the type of abrasive used, and the direction of sanding. Machine sanders strip rough stock with coarse sandpaper to fine grades up to scratch free smooth surfaces getting from metal polishing using successively finer grades of abrasives. Uniform direction for the sander makes sure even material is taken off the surface eliminating surfaces that were not evenly sanded. Choosing the proper substrate such as aluminum oxide for metals or silicon carbide for plastics considerably improves surface finish. All these parameters together determine the comfort and efficiency of the work done with the woodworking machine and, finally, the beauty and strength of the finished workpiece.

What Benefits Sanding Brings When Working on PLA 3D Prints?

What Benefits Sanding Brings When Working on PLA 3D Prints?

Eliminating Layer Lines on PLA 3D Prints

Sanding is one a very useful process for polishing PLA 3D prints by eliminating layer lines. This process begins with coarse sandpaper such as 100 grits and afterwards, finer grits can be used like 400 or even 1000. Sanding with water, also known as wet sanding, is very helpful because it reduces friction and the risk overheating the material. To achieve the best results, the sanding should be executed in circles or linear motion. Overall, high aesthetic and functional performance of PLA prints can greatly be enhanced through this process.

Disabling Fine Grit Sand Paper From Sanding Surface Of PLA Prints

Fine Grit sand paper from ranges of 400 to 1000 is required for achieving a final ever so polished finish along with the surface of the PLA prints. Finer grit sandpaper removes scratches left by coarse granulated sandpaper while providing an overall complete finishing touch. Wet sanding should be applied greatly while performing this process as it helps in avoiding dust and oil build up which distorts the PLA. Uniform and consistent coverage with sand grit 400 or lower produces a finer appearance making the PLA prints look elegant enough for display.

Is it Possible to Sand Different 3D Printing Materials?

Is it Possible to Sand Different 3D Printing Materials?

Methods for Sanding Resin in 3D Printed Objects

Due to resin’s brittleness, sneering can be done but with a cautionary approach. Start with a coarse grit, sanding paper ranging from 200-400 grit to remove support marks and flatten surfaces as the prep work. After the initial prep work, start using finer grits ranging from 800-1500 to smooth out the rough edges for a more polished finish. Sanding by water will yield better results by lowering the dust released and avoiding soak in clogged sandpaper, and will most importantly keep control over the whole process. Always ensure to sand with gentle pressure to avoid over-sanding or damaging the resin’s finer details. For a more exquisite, deeper finish, buffing or applying a clear coat can aid the resin’s clarity.

Differing the Sanding Techniques for Various 3D Materials

Differences such as surface properties and durability of materials used in 3d printing warrant the use of differing sanding techniques.

  1. PLA: Start sanding 3D PLA with coarse paper ranging from 200-400 grit and then undergo with soft grain of 800-1500 for a much more smoother finish, while ensuring to wet sand to control the heated dust which may deform the material.
  2. ABS: Interfaces for bonding ABS require a good deal of care. Acetone will smooth down the edges of ABS but excessive contact can cause melt off the surface. For tighter surfaces, auguring is suggested.
  3. PETG: Sanding PETG can be tricky but it can be done with a bit more effort. The belt sander does the job perfectly with 600 and 1500 belts, while for the final block it is recommended to use 3000 block. Trim and wipe the surface for optimal appearance.
  4. Resin Prints: When working with resin prints, the initial stage should require 200 grit to remove protrudes supports. As the work progresses finer grades of sandpaper should be used to enhance clarity making finish grits 2000 or super fine. Use block for sanding and polish to increase surface finish.

Careful planning and execution while selecting sanding techniques and tools according to materials ensures that the specific requireemtns of each print is achieve in a detailed and intricate manner.

Sanding Alternatives For Other Materials

  • Priming and Painting: Various materials such as PLA, ABS, and resin prints undergo a distinct change via the process of priming and painting. First, ensure the desired surface area is primed then apply paint for color and detailing on top of it. Spraying the paint allows for balance coverage.
  • Polishing: As for parts made with resin or PETG, one can use polishing compounds on such materials for improved luster. This technique works exceptionally well on transparent or decorative components.
  • Heat Treatment: Rotation of a block and sheet工作台机铣床置物框 can be used for smoothing out surplus imperfections on materials like ABS. Using this technique, one can achieve clear finishing. For working with outer areas, utmost precision is required to ensure no warping happens.
  • Vapor Smoothing: This method is largely used for ABS. The material is placed under a stream of solvent, for example, acetone, to undergo vapor smoothing. This enables the material to attain some gloss for better finish. Safety measures and appropriate ventilation are critical.
  • Coatings: The use of epoxy is recommended for coating as it can help to weather dry and polish the material, making it more appealing. These coatings are useful for sculpture materials as well as paintings.

By Priming and Painting, along with proper finishing touches; the materials can be finely tailored to the intended purpose while ensuring smooth performance.

What Kind of Equipment Do I Need to Sand 3D Printed Parts?

What Kind of Equipment Do I Need to Sand 3D Printed Parts?

Primary Tools for Proper Post Processing

  1. Sandpaper – Variety of grits (like 100-1000) is needed for surface finishing where coarse grits are used for shaping while finer grits are used for polishing.
  2. Sanding Blocks – These aids in making even pressure while sanding manually which helps improve surface regularity.
  3. Needle Files – Great for detail finishing in small or intricately shaped cuts especially in smaller prints.
  4. Rotary Tools – Great for fast material removal and working with complex geometries. Attachable accessories such as sanding drums or grinding bits make them even more versatile.
  5. Safety Equipment – Always put on gloves and a dust mask to guard oneself from debris and particles when sanding.

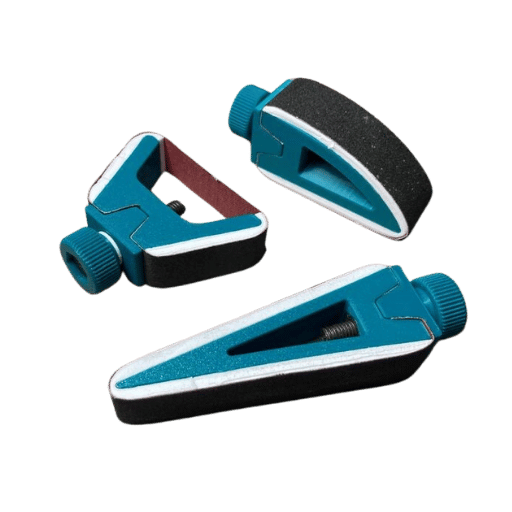
To ensure efficiency in post-processing workflow for 3D printed parts, make sure to equip yourself with these tools.

Applying Sanding Sponges for Optimal Results

  1. Pr.erp the Right Level of Grit: Different sanding sponges have diverse levels of grit. Grif of 60 and 80 apprehend coarse values, which are excellent for shaping and removing excess materials while finer edges such as 120 and 240 are used for smoothing out surfaces.
  2. C.S: Prepare the surface that is being worked on to be completely clean and devoid of any dirt or oil so the sponge can make proper contact with it durring sanding.
  3. Exert Equal Pressure: Make sure to grip the sanding sponge firmly and sand off the surface with equal pressure. Begin moving curcularly and once you get used to the motion change to linear depending on the shape and dhe contour of the surface sanded.
  4. Periodically Stop and Examine: Make sure to stop every once in awhile and check the surface being worked on to see if you are getting the results you wish for. Fine tune your approach and grit level as necessary to achieve the precise finish you are aiming for.
  5. Soak the Sponge: After you are done using the sponge wash it out to get rid of any unwanted dirt build up. This will keep the sponge effective for sand prep in the future.

If you follow these steps, your project will no longer resemble a sandblasted mess and will appear smooth and professional.

What Are the Challenges in Sanding 3D Prints and How to Overcome Them?

What Are the Challenges in Sanding 3D Prints and How to Overcome Them?

Sand it Down: Overcoming the Challenges of 3D Print Post-processing

While sanding, the foremost challenge that needs to be dealt with in the additive manufactured objects is sawdust we need to take care of bumps, lumps or even layer lines and fill them appropriately. Use coarse sandpaper or a sanding sponge to effectively target the most pronounced flaws. These should be smoothed and polished over time with finessed sand paper. While completing this task, make sure that the object is supported well so that there are no damages while undertaking the sanding process. Small files or sanding instruments can assist in dealing with difficult regions or intricate detailing. Along with that, putty filler can also assist with gaps like outer edge of 3d printed components along with some undulating forms. This helps in better surface preparation with lesser time.

How to Prime and Paint for a Glossy Finish

Aiding additively manufactured parts can be put in the paint for a glossy finish, but proper care and priming has to be followed along the edges for it to turn out perfect.  Primer for specific materials works best for plastic components, so use one that matches the 3d print best. Also ensures that a flat, even surface is prepared along with better paint sticking capability. Along with that, finely spray putting the can some 6 to eight inches away can do level spread equally. Finishing layers of primer with each layer while letting it dry completely like one must always do.

After priming, the next step involves surface preparation. Use 400 to 800 grit fine sandpaper and lightly sand the surface until smooth. When it comes to the paint, ensure to use quality gloss spray paint or acrylic paint meant for use on plastic. Paint should be applied in thin, even coats with ample dry time in between layers to allow the paint to dry completely to avoid dripping or uneven coating. After painting, it is ideal to seal the surface with clear gloss topcoat for further protection and shine improvement. Always remember to follow the necessary dry time for each step so that the results are optimal.

Frequently Asked Questions (FAQs)

Q: Why is sanding critical for the surface finish of 3D prints parts?

A: Sanding has to be done in order to achieve maximum aesthetics of a 3D print. First, it removes the layer lines. Second, it can serve as a paint preparation step. Sanding leads to better aesthetic and functional outcomes for FDM and 3D resin prints, which leads to high quality 3D prints.

Q: What type of sandpaper is used when sanding 3D prints?

A: When sanding, it is usually done in steps starting from rough which is around 200, then gradually moving to finer sandpaper for polishing. Coarse sanding helps tackle the features of the print and aids in further smoothing with medium grade.

Q: Which is better for finishing the surface of 3D prints, wet or dry sanding?

A: In most cases wet sanding makes more sense, especially with FDM and ABS prints, as it improves the finish quality. Wet sanding is better because there is less dust and the paper is less likely to clog, which is good for the overall outcome.

Q: How does layer height affect the sanding process for 3D prints?

A: With a lower layer height, the prints are easier to sand due to the finer layers resulting in fewer visible layer lines. Higher layer prints, on the other hand, will be require more extensive sanding to achieve a smooth surface.

Q: Can acetone smoothing be used instead of sanding for ABS prints?

A: Yes, acetone vapor treatment is a finishing step that is commonly performed with ABS prints. It is capable of dissolving the outer levels of the print and thereby creating a smooth surface without the need of excessive sanding.

Q: What is the best finishing process for functional parts that require maximum precision?

A: For functional parts, the most precise finish is always achieved by Carefully fine sanding off the excess material. Taking away too much can destroy the dimensions. If other finishes are added, sand under the coat and make sure that the surface is functional after the coat.

Q: How do I change my printer settings to make sanding easier?

A: If you want to adjust your settings in order for the prints to be easier to sand, lowering the layer height while lowering the speed is advised. These changes usually results with the seeming effortless sanding.

Q: Do you have any specific recommendations for sanding 3D resin prints?

A: While sanding 3D resin prints, it is best to use wet sanding to reduce the amount of heat generated and dust created. Since UV resin tends to be more brittle, it is best to be gentle and control the sanding to avoid damaging the surface of the print.

Q: What level of sanding finish should I expect on my 3D prints?

A: Following the correct sanding procedure for 3D prints will result in achieving a smooth surface with minimal layer lines. The surface will be ready for painting or other finishing processes depending on the material used and the detail on sanded surface.

Reference Sources

1. Effect of Sanding and Plasma Treatment of 3D-Printed Parts on Bonding to Wood with PVAc Adhesive

  • Authors: M. Kariž et al.
  • Journal: Polymers
  • Publication Date: 2021-04-01
  • Citation Token: (Kariž et al., 2021)
  • Summary:
    • This study analyzes the effects of sanding and plasma treatment on the bonding strength of 3D printed PLA, Wood-PLA, and ABS parts to wood using PVAc adhesive.
    • Methodology: The authors processed and evaluated the bond shear strength of the 3D printed samples with different surface treatments (non-treated, sanded, plasma treated, sanded and plasma treated). An assessment was done on the effects of surface treatment on the bondability of the 3D printed surfaces.
    • Key Findings: The findings suggest that the bond strength of 3D printed parts to wood was significantly improved by the application of a plasma treatment. In the case of ABS materials, the combination of plasma treatment and sanding was shown to provide the greatest bond strength, thus highlighting the value of surface preparation in adhesive bonding.

2. Surface Finishing of FDM-Fabricated Amorphous Polyetheretherketone and Its Carbon-Fiber-Reinforced Composite by Dry Milling

  • Authors: Cheng Guo et al.
  • Journal: Polymers
  • Publication Date: 2021-06-30
  • Citation Token: (Guo et al., 2021)
  • Summary:
    • The purpose of this study is to enhance the surface quality of 3D printed polyetheretherketone (PEEK) parts and carbon fiber reinforced PEEK (CF/PEEK) parts through dry milling to mitigate the staircase effect usually seen in Fused Deposition Modeling (FDM) methods.
    • Methodology: The research analyzed the interrelations between the 3D printing parameters such as raster angle and layer thickness with the milling parameters including depth of cut, spindle speed, and feed rate per tooth, for the purpose of improving surface finishing.
    • Key Findings: The results indicate that some milling settings could remarkably improve the surface finish of 3D-printed components, reducing the staircase phenomenon and enhancing the mechanical and cosmetic qualities of the parts.

3. 3D-printed Quake-style microvalves and micropumps

  • Authors: Yuan-Sheng Lee et al.
  • Journal: Lab on a Chip
  • Publication Date: 2018-04-17
  • Citation Token: (Lee et al., 2018, pp. 1207–1214)
  • Summary:
    • We will features the 3D printed micro valve and pumps, specialized for continous and precise flow control, whilst stressing the role of surface properties these components.
    • Methodology: In this study, the authors constructed microvalves and micropumps using a stereolithographic 3D printing technique, concentrating on the design and improvement of the printed parts for proper sealing and functionality.
    • Key Findings: When examining the 3D-printed microvalves, the study showed that they performed well and noted that the surface finish from the printed process was essential for device functionality. It demonstrates the possibilities of 3D printing for sophisticated fluidic systems.

4. Sandpaper

5. 3D printing

Kunshan Hopeful Metal Products Co.,Ltd

Kunshan Hopeful Metal Products Co., Ltd., situated near Shanghai, is an expert in precision metal parts with premium appliances from the USA and Taiwan. we provide services from development to shipment, quick deliveries (some samples can be ready within seven days), and complete product inspections. Possessing a team of professionals and the ability to deal with low-volume orders helps us guarantee dependable and high-quality resolution for our clients.

You may be interested in
Scroll to Top
Get in touch with Kunshan Hopeful Metal Products Co.,Ltd
Contact Form used