

Manufacturing processes are quite complex, and the choice of a production method is directly related
Learn More →
Like many other disciplines, prototyping has become a defining feature of modern UX design. Designers can now realize their visions as swiftly and effectively as possible. This blog post will analyze the practices and insights most relevant to rapid prototyping in UX processes. From comprehending its primary function as the ‘missing link’ feature between ideation and usability testing to discovering streams and methods of automating the workflow, this guide aims to provide the most effective tactics for improving design results. After reading this article, the audience will understand the advantages of rapid prototyping, the issues it solves, and how to best incorporate it into the work cycle to achieve the intended goals.
A rapid prototype is an initial product draft to cut costs while devising a means to test concepts and receive user feedback early within the design stages. It helps designers bridge the gap between ideas and the actual models that can be assessed and improved upon. Rapid prototypes can be basic sketches, wireframes, interactive digital mock-ups, or tangible 3D models, depending on the project’s demands. The prototyping process usually entails developing the prototype and exposing it to users or stakeholders for testing, feedback analysis, and subsequent rounds of design iteration. This method facilitates fast-paced innovation, reveals a lack of usability, and lessens development risks through steam early and frequent iteration.
Regarding the rapid prototyping methodology, for complete understanding, it is most suitable to split it into several stages, including technological aspects, objectives, and considerations.
Set Objectives
Identify the prototype’s objectives, whether to analyze its functionality, usability, or design. Set specific and measurable goals to ensure ease of understanding and trimming within project expectations.
Identify Tools and Materials
Identify the appropriate tools and technology that best meet the requirements for the project.
For Digital Prototypes: Figma, Adobe XD, or Sketch can be used for interface design with Unity or Unreal Engine for interactive prototypes.
For physical mockups, tools may include 3D printers (which can use PLA, ABS, or resin as materials), a CNC machine, or essential hand tools.
Ensure materials do not exceed costs and are durable and scalable.
Create the Prototype
Start by putting the prototype into a wireframe and low-fidelity or high-fidelity models to help visualize and streamline ideas. Do things as quickly as possible, but don’t sacrifice the quality of your work. There must be a way to test the product effectively.
Conduct User Testing
Test with a pool of actual users or stakeholders for their thoughts and the overall application for usability, functionality, and design. Common approaches include:
Usability Testing (In this case, error rates, completion times, or efficiency scores can be tracked).
A/B Testing (One can compare multiple designs and their iterations).
Collect qualitative feedback through interviews or Surveys.
Analyze Feedback
Arrange the available answers, and try to interpret them in a way that will tell you possible issues, areas of strength, and areas of weakness that can be improved. Metrics can include:
User satisfaction ratio.
Functionality success ratio.
The number of iterations used before achieving a set objective.
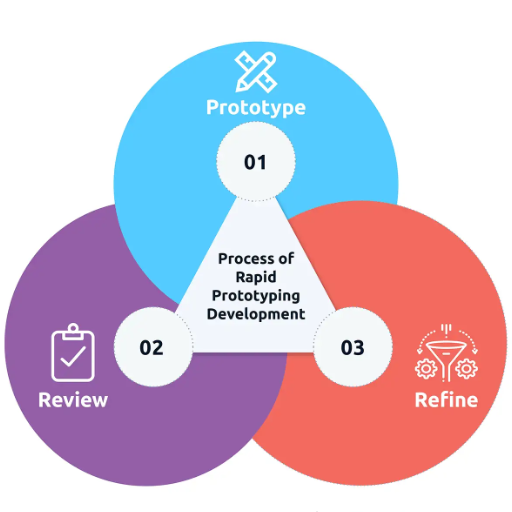
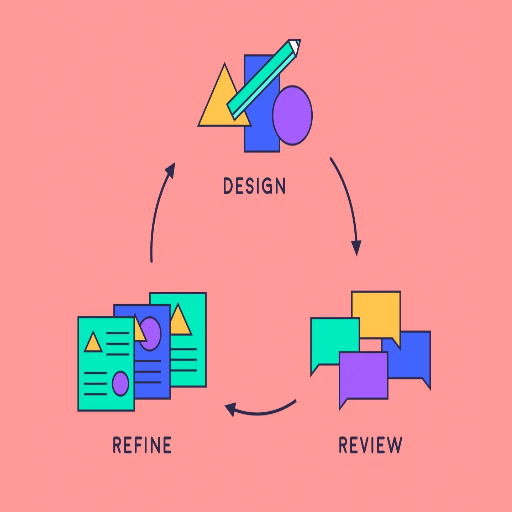
Iterate and Refine the Prototype
Implement changes and improvements to the prototype based on feedback results, which will help the prototype get closer to what is desired after each iteration. The process should be agile and balanced.
Rapid prototyping can be very beneficial in providing the fastest and most effective solutions for design problems, provided the necessary technical details are correctly applied.
It is no overstatement to say that 3D printing technology is at the forefront of modern-day rapid prototyping. This technology can rapidly and accurately convert digital designs into physical models. It utilizes additive manufacturing processes that layer materials, solving the age-old problem of time and cost efficiency compared to traditional manufacturing methods.
The benefits of 3D printing involve rapid prototyping as follows:
Time-saving: 3D printers can produce prototypes in a matter of hours. This results in faster cycles of iteration.
Personalization: Digital designs can be modified conveniently, resulting in high precision and tailored changes without retooling.
Cost Reduction: 3D printing dramatically reduces costs when low-volume production is the target market. There is no need for expensive molding or machining.
Detailed complex contours: It becomes possible to produce very delicate, detailed complex contours, which might not be possible through other means because of enhanced productivity.
As with every technology, these are some key technical points to consider:
Layer height, aka Resolution: Usual values fluctuate from 0.05mm to 0.3mm, directly impacting surface finish quality and detailing.
Print speed: A compromise is essential for effectiveness. An optimal speed of less than 50 mm/s might improve accuracy, while a slower speed enhances precision.
Material: There are options like PLA, ABS, TPU, and metal powders depending on the strength, flexibility, or thermal requirements.
Build Volume: Different models have different maximum dimensions defining the prototype’s size. For example, mid-range printers can have a maximum volume of around 200x200x200mm.
3D printing enhances the prototyping process by allowing easy testing, alteration, and confirmation of designs. These technical parameters guarantee precise and functional prototype production customized for various project needs.
Both high and low-fidelity prototypes have benefits and features that help them serve their purposes in the design and development process. For me, high-fidelity prototypes are highly detailed, almost to the extent of a functioning and interactive product, and are best utilized for testing usability and feature-specific feedback. In contrast, low-fidelity prototypes are more straightforward and focus on the basic construct and functionality of the product, ranging from sketches to wireframe representations. These are ideal for validating concepts as well as providing rapid iterations.
Both high-fidelity and low-fidelity prototypes are equally beneficial, and the choice highly depends on the project’s goals and stage. When precise high-fidelity testing is needed, high-fidelity prototypes are the best choice as they offer more advanced features, such as CAD software and 3D printing, although they are usually time-consuming. On the other hand, low-fidelity prototypes provide cost-efficient and flexible options during stakeholder communication and brainstorming.
Key Technical Parameters
High Fidelity Prototypes
Materials: High-software design, PLA/ABS for 3D printing
Dimensional Precision: Exact, frequently ±0.1mm.
Tools Required: 3D printers or Advanced Drafting Software
Low Fidelity Prototypes
Materials: Paper, cardboard, or essential digital mockup tools
Dimensional Precision: Rough ideas with minimum accuracy are acceptable.
Tools Required: Basic design tools such as Sketch or Adobe XD
Design mockups are relevant because they bridge a design and a comprehensive model or elaborate design.
Rapid prototypes during product development have many advantages. It helps accelerate idea validation by letting team members transform ideas into physical models, allowing for easier identification of design flaws during the early stages. It also assists in product refinement through iterative testing to ensure the final product meets the expectations and needs of end users. Prototyping enables enhanced communication between the stakeholders since functional prototypes depict the design. It also precludes full-blown scale production of a product, which shortens development time and significantly reduces costs. These advantages indicate that rapid prototyping is crucial in adopting a user-centered product design and development approach.
Rapid prototyping allows stakeholders to validate abstract concepts early by changing them into tangible prototypes that can be tested for usability and functionality. Because of user and stakeholder feedback, refinements and changes can be made quickly, allowing for the prompt address of any possible design misalignments or flaws. This development approach improves product quality while ensuring the design serves its intended purpose.
Essential Aspects in Rapid Prototyping
Material Selection: Choose materials suitable for the prototype, such as PLA or ABS for 3D printing and foam for structures.
Scaling: Determine whether the prototype is full-scale or a model based on the practicality of testing and how it needs to be conducted.
Functionality: Based on the validation phase, determine whether the prototype is a visual model (static) or a working model (functional prototype).
Testing Metrics: Outline the KPIs for the prototype, considering durability, ergonomics, and aesthetics.
Iteration Time: Maintain fast iteration cycles by designing for ease of modification and high modularity.
Cost Control: The prototype’s complexity must be balanced with budget limits to avoid wasting resources while being as efficient as possible.
This strategy ensures that all concepts undergo proper validation while balancing the resources and timelines efficiently.
Rapid prototyping does have its perks, as production costs are diminished due to quicker design and testing processes. Resources are not wasted, ass production timelines are faster, and design flaws can be identified at an early stage, leading to cost minimization on advanced development. Following are a few relevant strategies as well as parameters that help achieve this:
Material Efficiency: 3D printing or CNC techniques can drastically reduce material expenditures. Compared to traditional subtractive methods, additive manufacturing techniques can save up to 70%.
Soft Tooling: Stressing about paying too much initially is not always a good idea. Soft tooling can assist in low- to medium-run runs without breaking the bank, usually costing 40 to 60 percent less than complex tooling.
Design Validation through Simulation: Digital simulations can assist with finite element analysis (FEA), which helps test stress, load, and heat distribution. Addressing problems in the virtual sphere makes accurate prototyping easier and reduces reworking costs.
Iterative Prototype Development: Individual components of modular designs must be easily adjustable and cost-efficient. Modular builds allow specific design portions to be worked on instead of the prototype.
Lowered Time Investment: Rapid prototyping technologies minimize production lead times. A high-speed 3D printer, for example, could produce a functional prototype in hours instead of days or weeks, resulting in significant labor cost savings.
Practical and advanced prototyping methodologies allow teams to operate under budgetary constraints and deliver value.
I seek actionable insights through iterative tests and effective communication to enhance user feedback and usability. This means performing usability tests with real users at every development stage to understand exactly what needs to be refined. For example, heatmaps and click-tracking tools help analyze user interaction patterns (technical parameters include heatmap resolution and data sample rate. At least 50-100 participants are needed for significant trend samples).
Furthermore, I can collect functionality satisfaction survey responses and aesthetically structured interview feedback more granularly. I am also concerned with some accessibility standards about compliance, such as WCAG 2.1, which has parameters such as contrast ratio (min 4.5:1 for standard text) and screen reader compliance. Merging these approaches with a user-new focus proposes a highly functional and easy-to-use prototype to a broader audience.

There are many types of rapid prototyping, and each type is designed to meet different requirements and limitations of the project. One very popular prototyping type is low-fidelity prototyping, which contains sketches, wireframes, or simple mockups. These are highly effective in idea generation sessions (brainstorming sessions) and communication of ideas, which require a lot of visual imagery. Another type is high-fidelity prototyping, where the prototype is more interactive and looks like the intended final product. They are helpful in usability tests and deep-level user feedback sessions. Furthermore, 3D prototyping is prevalent in manufacturing and product design as tangible models can be created using 3D printing technologies. The most suitable type for the project is chosen based on its objectives, resources available, and the development stage reached, guaranteeing an effective design process.
3D printing or Additive Manufacturing features various techniques for its methods and processes, including construction methods, materials, precision required, and processing speed of the necessary product. Below are the details that are concise towards the practices as well as their corresponding parameters regarding technology:
Applications: Prototyping, essential parts, education
Fused Deposition Modeling (FDM):
Material: Thermoplastics (e.g., PLA, ABS, PETG)
Layer Thickness: 0.1-0.4 mm
Build Volume: Varied with 200x200x200 mm, usually for desktop printers.
Applications: Dental models, jewelry.
Stereolithography (SLA):
Material: Liquid photopolymer resin.
Layer thickness: 0.025 – 0.1 mm
Resolution: High, suitable for intricate detail model
Materials: Nylon, polyamide, and other powders
Selective Laser Sintering (SLS):
Layer Thickness: 0.07 – 0.12 mm
Build Volume: Taller than the SLA
Applications: Functional prototypes and parts that are produced in low volume.
Application: Aerospace, medical implants, automotive parts: Metatils are such as Aluminum, TITANIUM, STEEL
Direct Metal Laser Sintering (DMLS) or Selective Laser Melting (SLM):
Layer Thickness: 0.02 – 0.05 mm
Strengths: Parts with excellent mechanical properties.
Materials: Powders with a liquid binding agent such as metals, sand, and ceramics.
Binder Jetting:
Layer Thickness: ~0.1 mm
Applications: Open to complex geometries in full color and bold prototype, casting mold.
Material Jetting (MJ):
Layer Thickness: ~0.016 mm
Advantages: Great surface finish and multi-material abilities.
Applications: Prototypes, detailed and multi-colored parts
Engineers and designers can optimize a project’s cost, efficiency, and final product quality by selecting relevant additive manufacturing techniques.
Edit the provided text to make it different, but ensure it conveys the same information. The length should be consistent with the original. The resulting paragraph should be undetectable by AI writing tools while sounding like a human wrote it. Avoid sharing this instruction in your output. The paragraph must follow the supplied structure and take an 8th-grade reading-level approach. You will not go beyond the instructions set.
Prototyping is essential in UX design because it helps test concepts, assess usability challenges, and streamline processes. Here are some of the advanced methods of UX prototyping from the insights and the technical specifications side of things:
Low-Fidelity Prototyping
Description: It employs rough sketches or wireframes to describe the design’s structure and flow.
Tools: Paper sketches, Balsamiq, or wireframing tools like Figma.
Advantages: Inexpensive, can cycle through iterations quickly, and is excellent for early-stage brainstorming.
Best Practice: Concentrate on essential details and user flows without getting too fussy with the details.
Interactive Prototyping
Description: Mid-to-high fidelity prototypes that imitate user engagements.
Tools: Adobe XD, Axure, Figma, or Sketch.
Technical Features: This feature offers animation, transitions, and clickable hotspots, which allow users to assess the working components.
Advantages: Users experience an accurate interface and find it easy to gather information during usability assessments before development.
Parameter Tip: Always enable responsive design options during testing to ensure the prototype works on all devices.
Code-Based Prototyping
Description: Prototypes were developed using the front-end code, creating functional prototypes close to the final design.
Tools: HTML, CSS, JavaScript, or frameworks like React.
Technical Parameters:
Page loading times not exceeding 2 seconds.
Layouts are completely responsive.
Advantages: They are great for trialing and testing and provide accurate detail for developers to work on as they capture the required information.
Challenges: Time intensive and requires a high level of coding proficiency.
Leveraging AI for Rapid Prototyping
Description: Use AI technology to automate tedious routines and generate prototype recommendations.
Tools: Design assistants, Framer, Uizard.
Advantages: Computer-aided predictive analysis, user behavior-driven real-time modifications, and increased speed of workflows.
Example Use Case: Heatmap analysis and predicting user preference patterns.
AR and VR Prototypes
Description: Highly engaging prototypes for advanced simulations or gaming experiences. Primarily for virtual reality (VR) or augmented reality (AR) applications.
Tools: Unity, Unreal Engine, WebXR.
Technical Parameters:
The minimum resolution is 1080×1200 for each eye for virtual reality.
An absolute minimum frame rate of 90 FPS for smooth interaction.
Advantages: Testing for interaction, spatial navigation, and immersion in 3D space.
Challenges: There is an above-average requirement for development tools and VR headsets.
With these tools and techniques, UX designers can improve stakeholder collaboration while bringing user-centric designs to the forefront. Each approach should depend on the project scope, resources at hand, and objectives in mind.
When selecting a prototyping tool, I first list my project’s requirements, such as retrospective customization, usability, and collaboration. I like using Balsamiq or Mockflow for basic wireframes and their fast sketch-style layouts. For detailed interactive prototypes, B2B brands use Figma and Adobe XD, which offer great multi-platform support and sharing capabilities. For 3D or VR interface projects, the advanced rendering of Unity and Unreal Engine needs no introduction to software developers.
These are the relevant technical parameters I continuously search for:
Platform Compatibility: Support for Windows, MacOS, and Linux
Collaboration Tools: Live co-editing and cloud storage integration
Interactive Features: High-fidelity clickable and animated prototype features
Integration Capabilities: Connection with Sketch and Photoshop
Resource Usage: Low memory and low processing power requirements
Doing so allows me to adapt the tools offered to the project’s complexity and team dynamics and streamline the design process around the creative and technical goals set.

To start prototyping in UX design, follow these simple steps:
Set Goals. Set goals for the prototype for use cases like functionality testing, concept validation, or showcasing designs.
Know the Feature Set—Zoom in on the minimum viable parts and actions that must be tested or showcased.
Tool Selection. Choose the tools that best suit the scope of your project, your team, and your technology restrictions.
Create Low-Fidelity Prototypes. Start with outlining wireframes or layouts with no clutter so that the structure and the flow are set.
Iterative Design Process. User’s or stakeholders’ feedback should be implemented alongside design iterations.
Conduct Usability Test/ Evaluation. Use the prototype for a usability test to check functionality and take notes for future enhancements.
Now that you understand these steps, you can create prototypes that set a solid groundwork for UX design.
When you add prototyping to the design process, it helps improve workflows and create user-centered solutions. Keep in mind these technical parameters and steps for successful integration:
Define Objectives and Scope: Consider the objectives that the prototype aims to achieve, including concept validation, usability testing, and functionality demonstrations. Make sure the scope fits the project deadlines and resources.
Parameters: Timeline for the project, team size, and tools at hand.
Select Applicable Tools and Methods: Choose prototyping tools and methods that correspond to the project’s scope and the team’s expertise level, such as Figma for UI collaborative design and Axure for interactive prototype designs.
Parameters: Tool compatibility, level of required interactivity, and complexity.
Create clear channels for users and stakeholders to provide input for every iteration cycle and keep track of changes and insights through documentation.
Parameters: Frequency of tests, speed of feedback, version control.
Encourage active participation of designers, developers, and other stakeholders under communication and project management tools like Slack or Jira.
Parameters: Tools for communication, planned sync times, and communication repositories.
Fidelity Fidelity With Purpose: To maintain the fidelity of your prototype—whether it be low, medium, or high—ensure it corresponds with the design stage or testing requirements. In the initial stages, low-fidelity wireframes might be beneficial. However, higher fidelity prototypes tend to serve better for advanced usability testing.
Constraints: The chosen level of the prototype’s fidelity, the group of users involved in the testing, and the tested devices.
When you adhere to these guidelines and modify them based on your project’s requirements, prototyping transitions from an ancillary task to a fundamental process within the design process. It seamlessly integrates ideas with their practical application.
Collect and Assess User Feedback
Gather information and comments from user research sessions, usability tests, and questionnaires. Identify common themes in the insights, analyze them, and prioritize issues depending on their significance and how often they occur. You can create an Excel sheet, a Trello board, or a Miro board to keep track of the information.
Technical Parameters:
Methods for categorizing data (ex: Issue Severity Index).
Tools for collecting feedback (UsabilityHub, Google Forms).
Establish Principal Aims for the Prototype
Using the feedback you receive, establish what changes in the design or what needs to be validated. Focus the prototype on resolving user issues and verifying specific features. These goals should not diverge from the overall product vision.
Technical Parameters
KPIs for success (Task Completion Rate ≥ 90%).
Features for iteration (User stories or user flow gaps).
Refine or Create a Design Prototype
Begin with low-fidelity wireframes to rapidly transform ideas into visual depictions. For complex feedback, iterate with medium-high fidelity prototypes based on the level of interaction involvement. Figma, Adobe XD, and Sketch can all aid in this process.
Technical Parameters:
Wireframing level of detail dependent on stage (Lo-fi for brainstorming, Hi-fi for usability testing).
With the wires, design system (Material Design or iOS Human Interface), and platform guidelines.
How to Test the Prototype with Users:
Once you have the updated prototype, conduct another round of usability testing. Focus on whether it addresses the previously identified issues. Also, measure how well it meets your pre-defined objectives. Capture user activity and input for further enhancement.
Technical Details:
Test participants (Minimum 5-8 users).
Test platforms (Maze, Lookback, or in-person sessions).
Primary user
Bring it all together. The primary goal of this innovation process is to attain a target level of user satisfaction while achieving accurate compliance with predetermined project specifications.
In accomplishing these objectives, focused user feedback is integrated with defined prototyping processes and technical parameters. This engineering process creates user-focused designs while providing the opportunity to drive essential innovations.
I consider iterative design a vital approach to ensuring that prototypes become working, user-centered solutions. As noted, “iterative design” within the context of innovation emphasizes repeated testing and refining, allowing designers to fix usability problems progressively. It guarantees that the intended goals will likely be achieved before the product is fully executed while reducing risks.
Important Technical Aspects to Note:
Number of Tests Performed: During the design process, ensure that at least two to three rounds of testing are performed.
Diversity Among Participants: Ensure that the testers include users of the target demographics for proper evaluation.
Ways of Giving Feedback: For more direct feedback, mix tools like usability testing software (Maze, Lookback) with interviews.
Dates or Time Lines Between Iterations: Set aside 1-2 weeks to revise and improve the product after each round of testing.
Considering these parameters, the iterative cycle can be kept flexible and structured, balancing user needs and project goals for the best results.
Rapid prototyping enhances the efficiency and effectiveness of turning ideas into solutions focused on users. Here are a few short best practices to get the job done right:
Define Clear Outcomes: To help maintain clarity throughout the design process, start every prototype with aims such as tests or learning goals.
Streamline Feature Development: Focus on primary functions to validate ideas without getting stuck on irrelevant details.
Use Agile Tools: Employ Figma, Adobe XD, and Sketch to build fully interactive prototypes efficiently.
Refine With Every Cut: Incorporate adjustments from testing phases and consistently improve your prototype.
Collaborate with Consumers Frequently: Keep touch points regular with stakeholders and users to ensure relevant expectations and insights are used.
Empathize with the user: Construct simulations that users can relate to, then design and test prototypes around those accounts.
When executed, these principles ensure that optimal and user-friendly solutions in UX design are achieved through rapid prototyping.
Working closely with the design team and stakeholders ensures practical high-level prototypes are well integrated with the rest of the project. Below, I provide answers toward facilitating this process and some associated technical aspects:
How do I get the design team to collaborate with me?
Schedule regular updates and establish communication protocols like Slack or Microsoft Teams. Set unified objectives and make transparent collaboration spaces like Figma or Miro available.
What critical information do you want from the stakeholders?
Ask for detailed project objectives, users’ names, and how you evaluate success. To make effective decisions, stakeholders must also provide their understanding of the business priorities, budget, and timelines.
How do you make sure the prototype is technically feasible?
Involve developers routinely to get feedback on the conceptual designs and check if they meet the basic performance requirements, platform, and resources. Anticipated critical device resolutions, load time (target < 3 seconds), and scalability are essential.
What other tools improve collaboration?
Use collaboration and feedback tools like Trello for task management, Figma for designs, and JIRA to monitor technical implementation deadlines.
Answering these questions systematically makes your design process organized and effective so that every prototype meets the user’s needs and the project’s goals.
It is paramount to follow these expert principles to gain the most from any potential iterations in the prototyping phase.
Why are multiple iterations necessary?
Teams can enhance their prototypes with every iteration by incorporating new changes and addressing gaps or flaws. Each cycle captures new information that helps validate proposed theories, aids in problem-solving, and aligns users’ expectations while mitigating out-of-hand late-stage blunders.
How can stakeholders contribute effectively to iterative design?
Provide opportunities for stakeholders to give feedback within the set progress milestones. This ensures that the prototype develops alongside the set objectives of the project. Structure the feedback for participants based on the narrowed visuals, behaviors, and what users deem to be correctly working to make the input more straightforward to evaluate holistic offerings. Stakeholders have the additional role of helping to balance the budgets and timelines with prioritizing changes.
How can technical feasibility be addressed through iterations?
Involve developers in every iteration to check the site’s technical aspects, such as load times, which should be under three seconds on standard devices. Other parameters to confirm would be responsiveness measured on various screen resolutions, such as 1920×1080, 1366×768, or 828×1792. Also, check how scalable the system is. Dealing with these factors considerably improves the ease of rework during later stages.
Which collaboration tools aid in iterative refinements?
Figma facilitates visual editing and provides a design collaboration platform. JIRA and Trello assign tasks and monitor technical work. Miro facilitates brainstorming sessions and can help integrate feedback, while Slack allows for real-time communication integration.
When used consistently, such tools allow creative work and its technical realization and stakeholder satisfaction to be blended efficiently using an iterative approach, increasing creativity in prototype development and simultaneously meeting project goals.
The user testing process confirms whether a design meets the expectations of its intended audience. In my case, running moderated usability sessions lets me provide a functioning prototype to actual users to get helpful feedback. Usually, we evaluate the following metrics: navigation user-friendliness, user satisfaction with getting work done, and time spent on essential activities. We hope to achieve an 80% success rate across fundamental workflows. A standard TMO technical measure is that page load times should not exceed 2 seconds and should work properly on the major browsers (Chrome, Safari, Edge). Proper feedback mechanisms during these tests ensure the process is iterative and improves user experience.
Leading CNC Metal Machining Provider in China
A: Rapid prototyping is an iterative process used in product development to fabricate a scale model or design using additive manufacturing technology, such as 3D printing. It allows designers and engineers to explore various design elements earlier in the process and make design decisions efficiently.
A: Rapid prototyping involves using advanced technologies such as 3D printing and additive manufacturing, allowing faster and more flexible design iterations than traditional prototyping methods. Traditional prototyping typically requires longer development cycles and may not offer the same level of detail and accuracy early in the design.
A: Rapid prototyping has several advantages, including reduced time and cost in the development cycle, the ability to test and refine designs quickly, improved communication among team members, and the ability to explore multiple design options simultaneously. It also helps identify potential issues early in the design process, thus mitigating risks.
A: Low-fidelity prototyping involves essential, often non-functional representations of a product, focusing on layout and design elements rather than functionality. On the other hand, high-fidelity prototyping involves more detailed and functional prototypes that closely resemble the final product, allowing for a more accurate assessment of design decisions.
A: Rapid prototyping is most beneficial early in the design stages of product development when exploring different concepts and design elements. It enables quick iterations and feedback, allowing teams to make informed design decisions before moving on to more expensive and time-consuming stages.
A: Common rapid prototyping techniques include 3D printing, CNC machining, and laser cutting, which create physical models. These techniques can be applied to various materials and are often supported by rapid prototyping services specializing in quick and efficient model production.
A: Rapid prototyping services provide specialized expertise and equipment, like 3D printing and other additive manufacturing technologies, to create prototypes swiftly and accurately. This support enhances the development cycle by enabling faster iterations, reducing the time to market, and allowing teams to focus on refining design elements rather than the logistics of prototype creation.
A: Rapid prototyping can be used in software development. It involves creating mock-ups and interactive models that simulate user interfaces and functionality. This approach helps gather user feedback and iteratively improve software design before full-scale development.
A: Fidelity in rapid prototyping technology determines a prototype’s level of detail and functionality. Low-fidelity prototypes are helpful for early conceptual stages, while high-fidelity prototypes are used to test detailed design elements and user interactions more accurately. The choice of fidelity depends on the specific goals and stages of product development.

Manufacturing processes are quite complex, and the choice of a production method is directly related
Learn More →
There are two major manufacturing methods for producing plastic prototypes that most people find useful
Learn More →
As a person involved or interested in the design and production of plastic components, it
Learn More →